BERT 是如何构建模型的
目录
Photo by Damian Patkowski on Unsplash
Good things take time, as they should.
前面我写了一篇文章来讲 BERT 是如何分词的,现在,轮到该说说 BERT 模型是如何定义的了。
BERT 模型的大致结构可能大家已经很清楚了,实际上核心就是 Transformer encoder。本文主要是结合代码(modeling.py)实现来看下模型的定义,以及相关辅助函数,带你解读整个 modeling.py。
modeling.py 共有 2 个类,16 个函数,我先放一张 modeling.py 中类、方法和函数的总的调用关系图,大致了解一下:
本文先介绍下文件中仅有也比较重要的两个类:BertConfig 和 BertModel。然后根据构建 BERT 模型「三步走」的顺序,分别介绍下这三步,同时介绍一下相关函数。
BertConfig
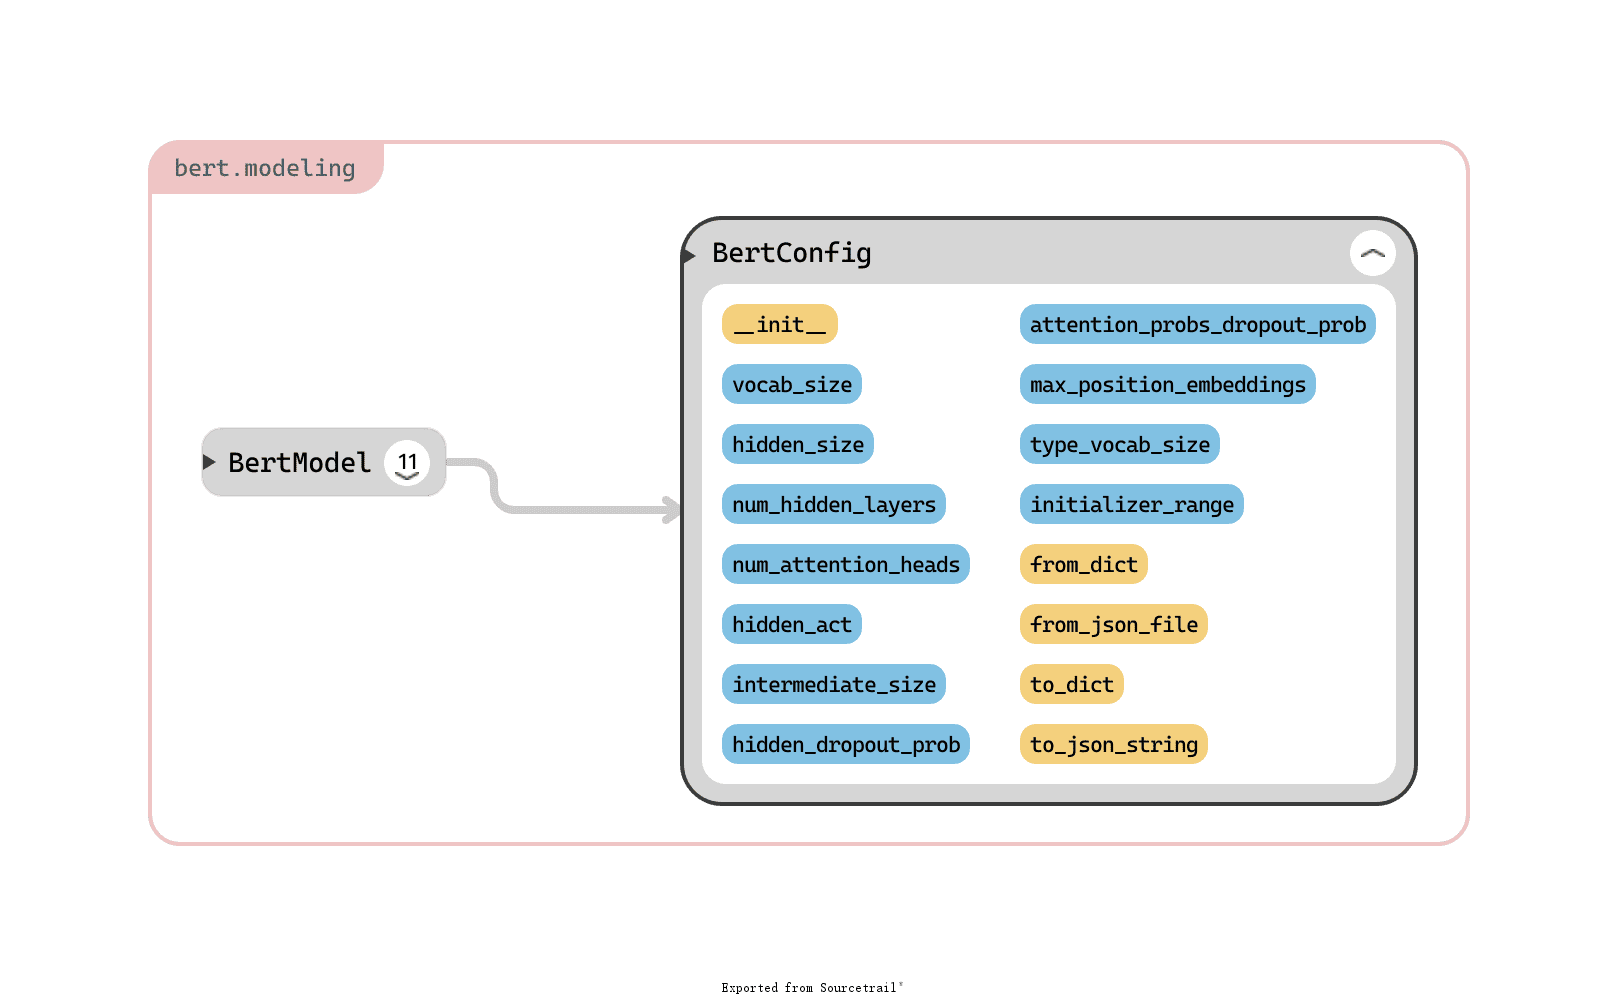
BERT 模型的配置类,BERT 的超参配置都在这里。其参数(蓝色)和方法(黄色)总览如下:
下面我分别介绍下参数和方法的意义。
参数
vocab_size:词汇表大小。hidden_size=768:encoder 层和 pooler 层大小。这实际上就是 embedding_size,BERT 干的事情就是不停地优化 embedding。。。num_hidden_layers=12:encoder 中隐层个数。num_attention_heads=12:每个 attention 层的 head 个数。intermediate_size=3072:中间层大小。hidden_act="gelu":隐层激活函数。hidden_dropout_prob=0.1:所有全连接层的 dropout 概率,包括 embedding 和 pooler。attention_probs_dropout_prob=0.1:attention 层的 dropout 概率。max_position_embeddings=512:最大序列长度。type_vocab_size=16:token_type_ids的词汇表大小。initializer_range=0.02:初始化所有权重时的标准差。
方法
from_dict(cls, json_object):从一个字典来构建配置。from_json_file(cls, json_file):从一个 json 文件来构建配置。to_dict(self):将配置保存为字典。to_json_string(self):将配置保存为 json 字符串。
BertModel
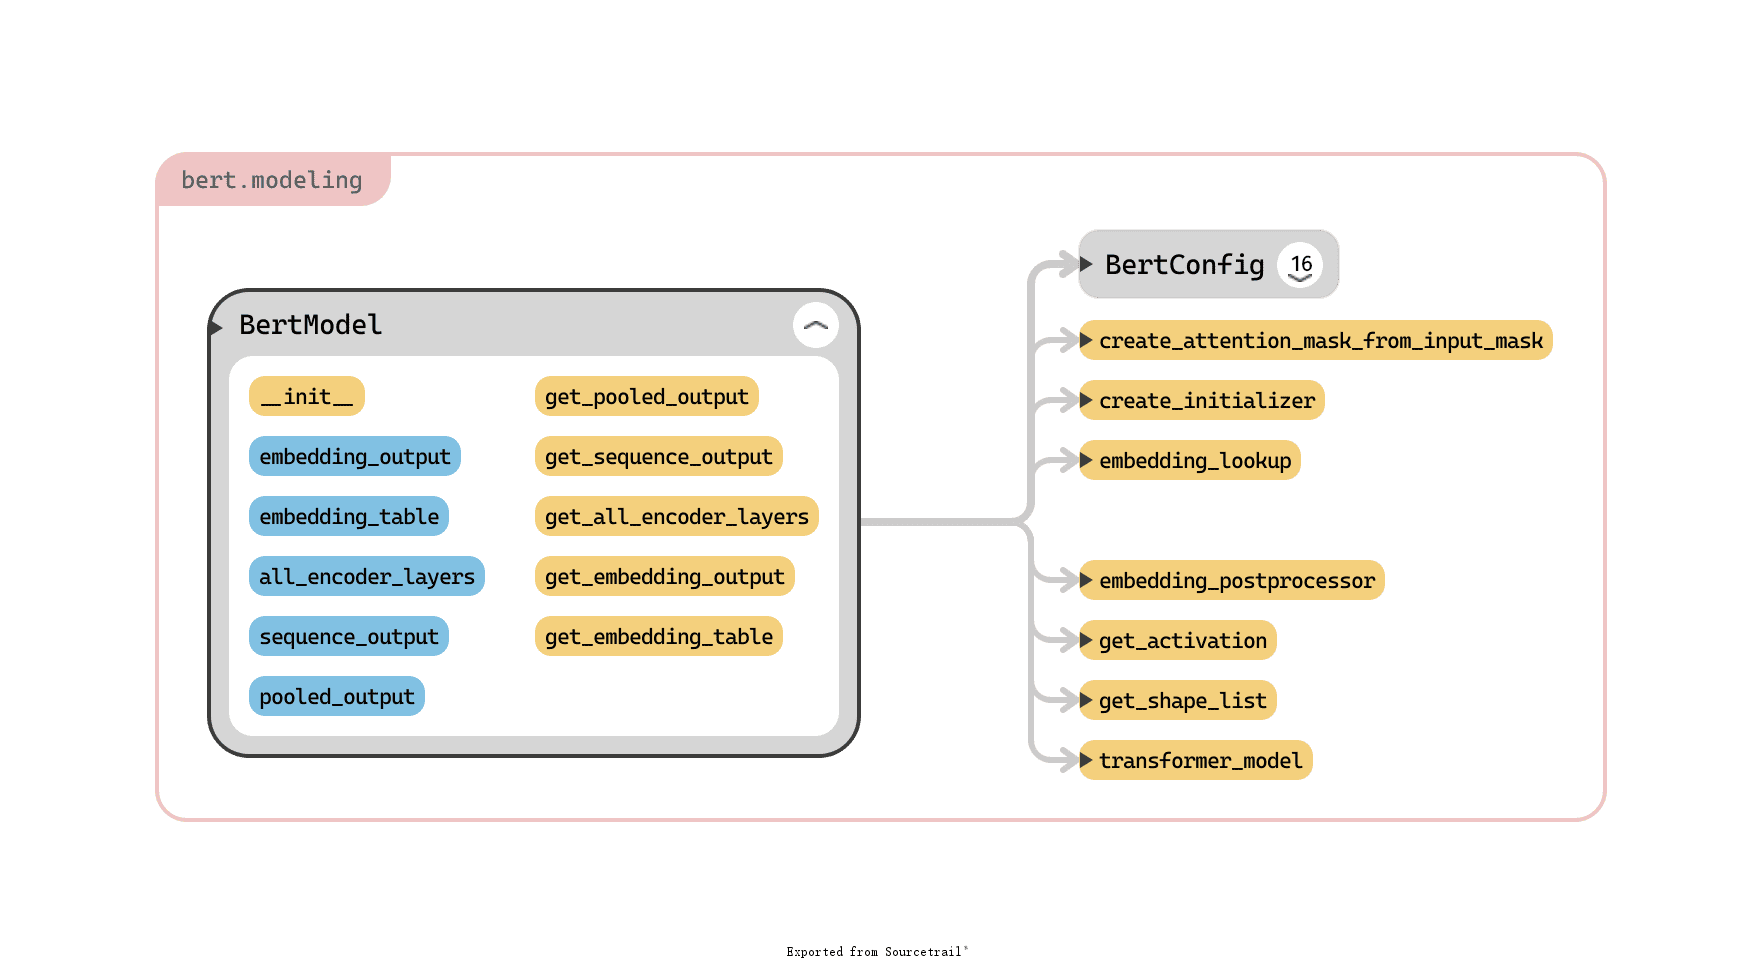
BERT 模型类,主角,BERT 模型的详细定义就在这里了。其参数(蓝色)、方法(框内黄色)和对其他类、函数的调用关系总览如下:
下面我分别介绍下参数和方法的意义。
参数
config:配置,BertConfig实例。is_training:是否开启训练模式,否则是评估/预测模式。也控制了是否使用 dropout。input_ids:输入文本对应的 id,大小为[batch_size, seq_length]。input_mask=None:int32 类型,大小和input_ids相同。token_type_ids=None:int32 类型,大小和input_ids相同。use_one_hot_embeddings=False:是否使用 one-hot embedding,否则使用tf.embedding_lookup()。scope=None:变量 scope,默认为bert。
方法
__init__():重头戏,模型的构建在此完成,三步走完成。主要分为三个模块:embeddings、encoder 和 pooler。首先构建输入,包括input_ids、input_mask等。其次进入 embeddings 模块,进行一系列 embedding 操作,涉及embedding_lookup()和embedding_postprocessor()两个函数。然后进入 encoder 模块,就是 transformer 模型和 attention 发挥作用的地方了,主要涉及transformer_model()函数,得到 encoder 各层输出。最后进入 pooler 模块,只取 encoder 最后一层的输出的第一个 token 的信息,送入到一个大小为hidden_size的全连接层,得到pooled_output,这就是最终输出了。get_pooled_output(self):获取 pooler 的输出。get_sequence_output(self):获取 encoder 最后的隐层输出,输出大小为[batch_size, seq_length, hidden_size]。get_all_encoder_layers(self):获取 encoder 中所有层。返回大小应该是[num_hidden_layers, batch_size, seq_length, hidden_size]。get_embedding_output(self):获取对input_ids的 embedding 结果,大小为[batch_size, seq_length, hidden_size],这是 word embedding、positional embedding、token type embedding(论文中的 segment embedding)和 layer normalization 一系列操作的结果,也是 transformer 的输入。get_embedding_table(self):获取 embedding table,大小为[vocab_size, embedding_size],即词汇表中的词对应的 embedding。
Embedding
如前所述,构建 BERT 模型主要有三块:embeddings、encoder 和 pooler。先来介绍下 embeddings。
顾名思义,此步就是对输入进行嵌入。在初始词向量的基础上,BERT 又加入 Token type embedding(即论文中的 segment embedding)和 Position embedding 来增强表示。
计算初始词向量对应于 embedding_lookup() 函数,参数为
input_idsvocab_sizeembedding_size=128initializer_range=0.02word_embedding_name="word_embeddings"use_one_hot_embeddings=False
此函数根据 input_ids 找对应的 embedding,输入大小为 [batch_size, seq_length],输出两个值:
output,大小为[batch_size, seq_length, embedding_size]。embedding_table,大小为[vocab_size, embedding_size]。
后续的骚操作对应于 embedding_postprocessor() 函数,参数为:
input_tensoruse_token_type=Falsetoken_type_ids=Nonetoken_type_vocab_size=16token_type_embedding_name="token_type_embeddings"use_position_embeddings=Trueposition_embedding_name="position_embeddings"initializer_range=0.02max_position_embeddings=512dropout_prob=0.1
该函数在初始 embedding(input_tensor)的基础上再进行一顿 embedding 骚操作,然后加上 layer normalization 和 dropout 层。
根据 use_token_type 和 use_position_embeddings 的值,最多会进行两种骚操作:
- Token type embedding:即论文中的 segment embedding,首先会创建一个
token_type_table,然后拿着token_type_ids去查,得到 token type embedding,该 embedding 的 shape 和原 embedding 是一样的,直接将其加到原 embedding 就行。 - Position embedding:位置信息嵌入。这里有一个需要注意的地方:
max_position_embeddings,这个参数的值必须 ≥seq_length,因为代码中会首先构造一个大小为[max_position_embeddings, embedding_size]的full_position_embeddings,然后再使用tf.slice截取seq_length大小,从而得到一个[1, seq_length, embedding_size]的 embedding,最后加上原 embedding 即可。这里注意,为什么得到的 embedding 第一维是 1 呢?因为一个 batch 内的位置嵌入是相同的,假如一个 batch 有两句话,那么这两句话第一个字的位置嵌入都是 1 对应的 embedding,是相同的,所以可以直接 broadcast 到整个 batch 维度上。而 token type embedding 这些是不同的。
在 Token type embedding 代码实现部分,根据 token_type_table 获取 token_type_ids 的对应 embedding 的时候,BERT 使用的是 one-hot 方法,即 token_type_ids 的 one-hot 矩阵乘 token_type_table,而不是使用的直接按索引取的方法。根据 BERT 代码注释,这是因为对于该 embedding,token_type_vocab_size 通常很小(一般为 2),此时 one-hot 方法更快:
This vocab will be small so we always do one-hot here, since it is always faster for a small vocabulary.
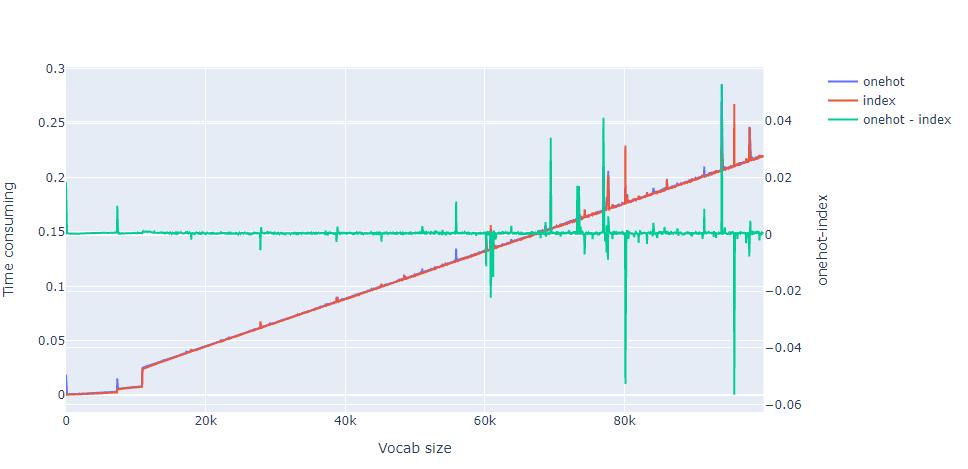
我一开始并没想通这点,于是做了个测试,结果如下:
可见两者差距甚小,在 vocab size 比较小的时候,one-hot 甚至会比索引方法慢。one-hot 方法需要进行矩阵乘法,而索引方法则是直接按索引取值,所以 one-hot 应该慢点才对,此问题尚未想清楚,欢迎评论区讨论。
OK 回到正题,一顿操作后 embeddings 的维度维持不变,仍然是 [batch_size, seq_length, embedding_size]。归来仍是少年。
Embeddings 部分结束。
Encoder
Embeddings 部分结束后的输出大小是 [batch_size, seq_length, embedding_size],这个将会输入给 encoder。
该部分首先创建一个 attention_mask,然后作为参数传给 transformer encoder 模型,最终得到多层 encoder layer 的输出。实际传给下一步 pooler 的时候,使用的是最后一层输出。
创建 attention_mask 部分使用的是 create_attention_mask_from_input_mask() 函数,参数为:
from_tensorto_mask
此函数将一个二维的 mask 变成一个三维的 attention mask,最终的输出 shape 为 [batch_size, from_seq_length, to_seq_length]。from_tensor 在这里的唯一作用就是提供一下 batch_size 和 from_seq_length。事实上该 attention_mask 是全 1 的:
We don’t assume that
from_tensoris a mask (although it could be). We don’t actually care if we attend from padding tokens (only to padding) tokens so we create a tensor of all ones.
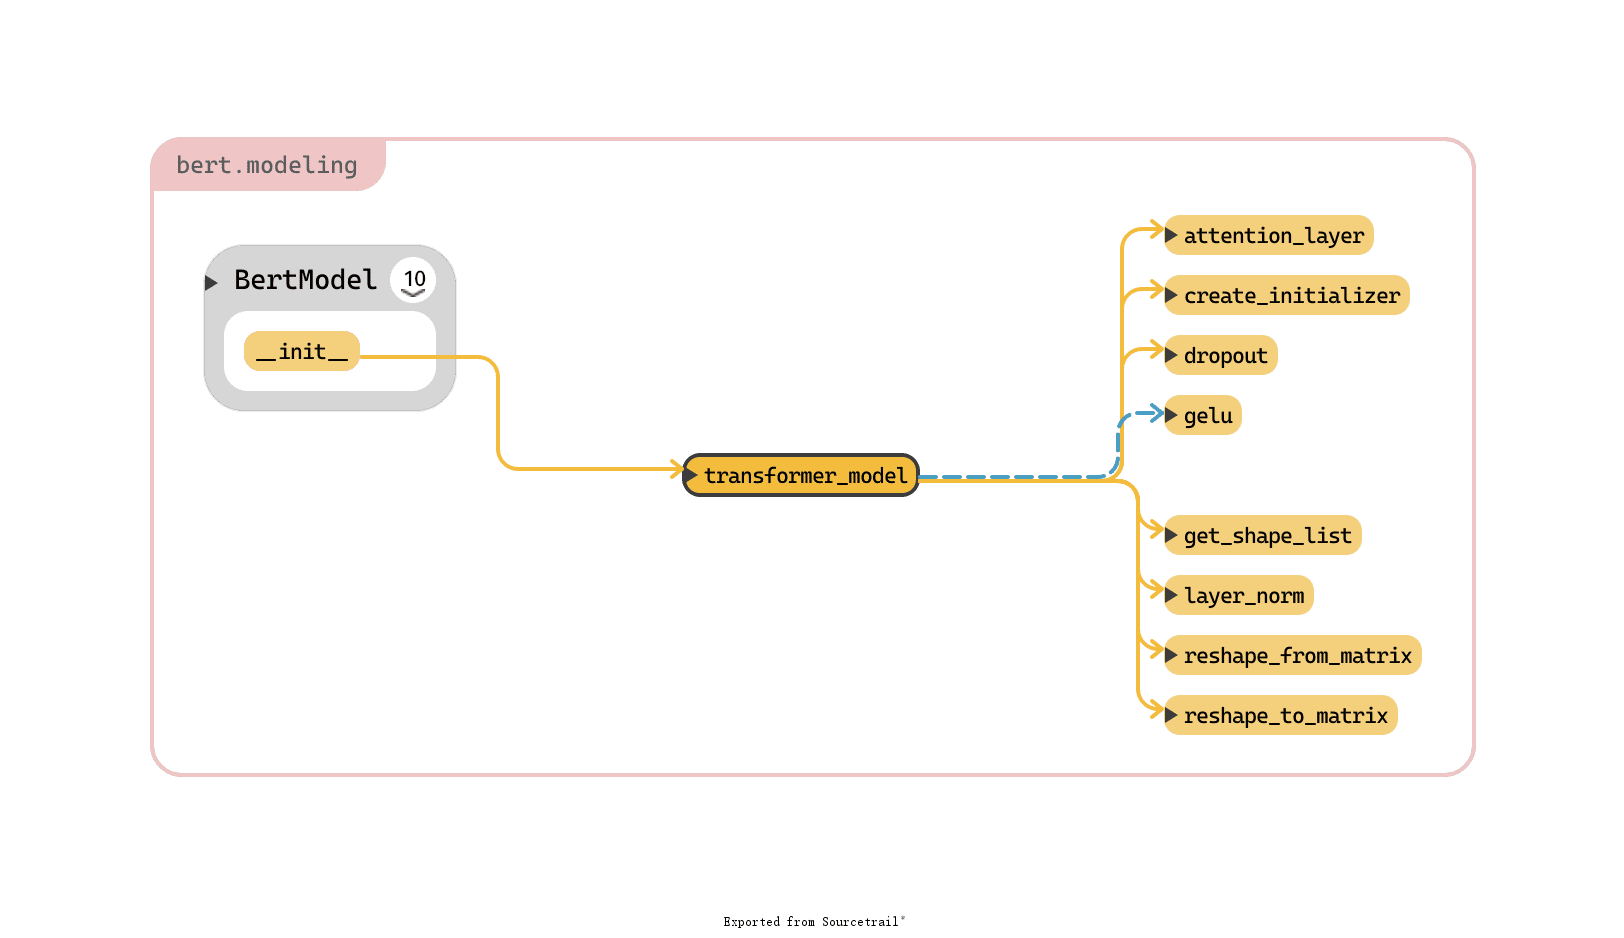
核心 transformer encoder 的部分对应于 transformer_model() 函数,参数为:
input_tensorattention_mask=Nonehidden_size=768num_hidden_layers=12num_attention_heads=12intermediate_size=3072intermediate_act_fn=geluhidden_dropout_prob=0.1attention_probs_dropout_prob=0.1initializer_range=0.02do_return_all_layers=False
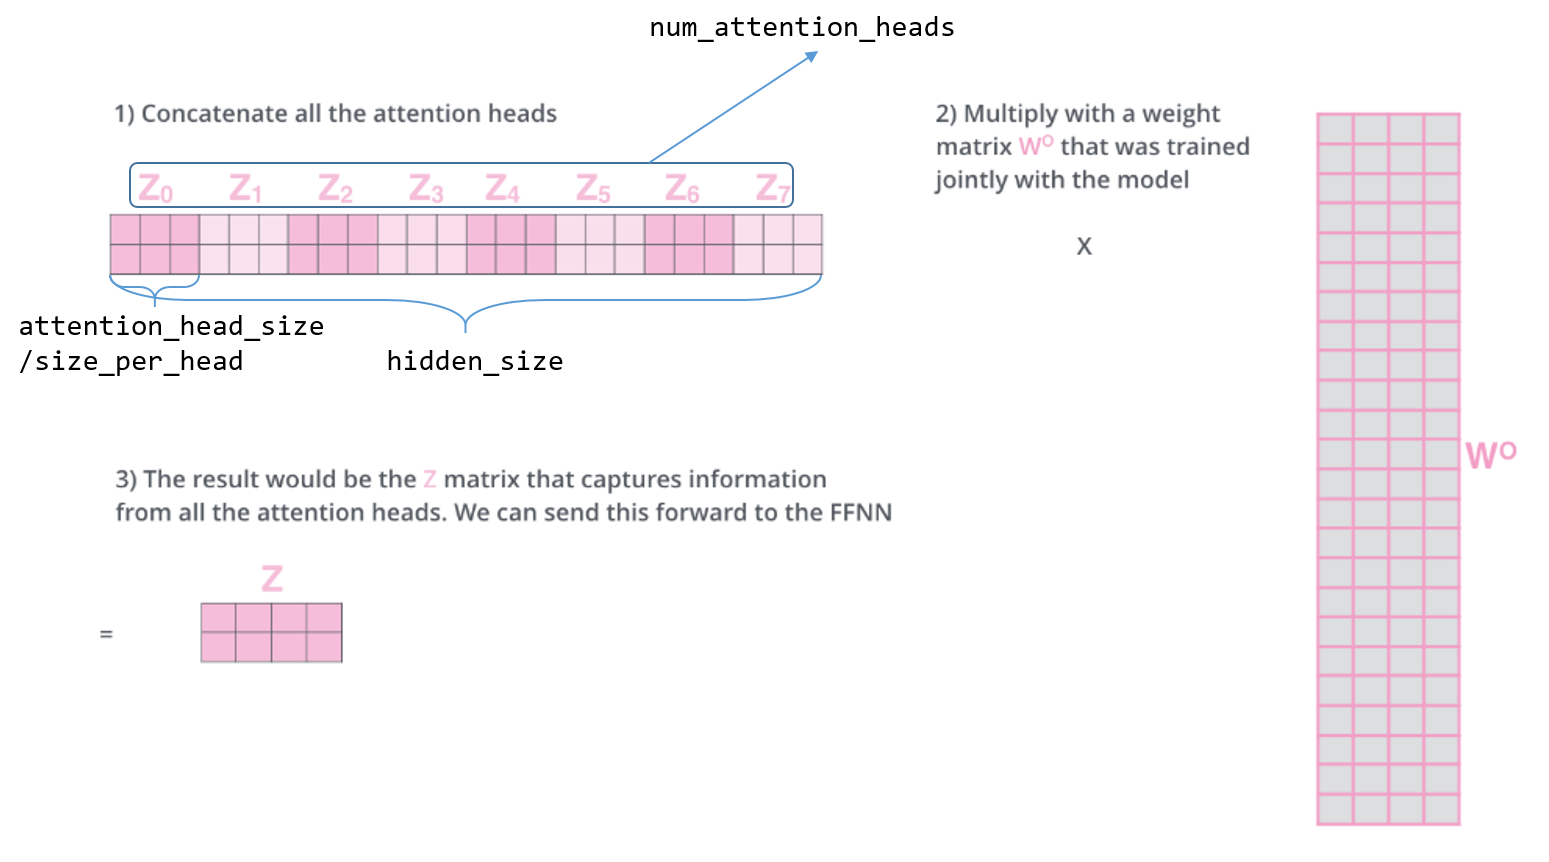
要注意的一点是,hidden_size 必须能够整除 num_attention_heads,因为每个 head 的大小就是两者相除得到的,两者关系如下图:
和其他函数的调用关系如下图:
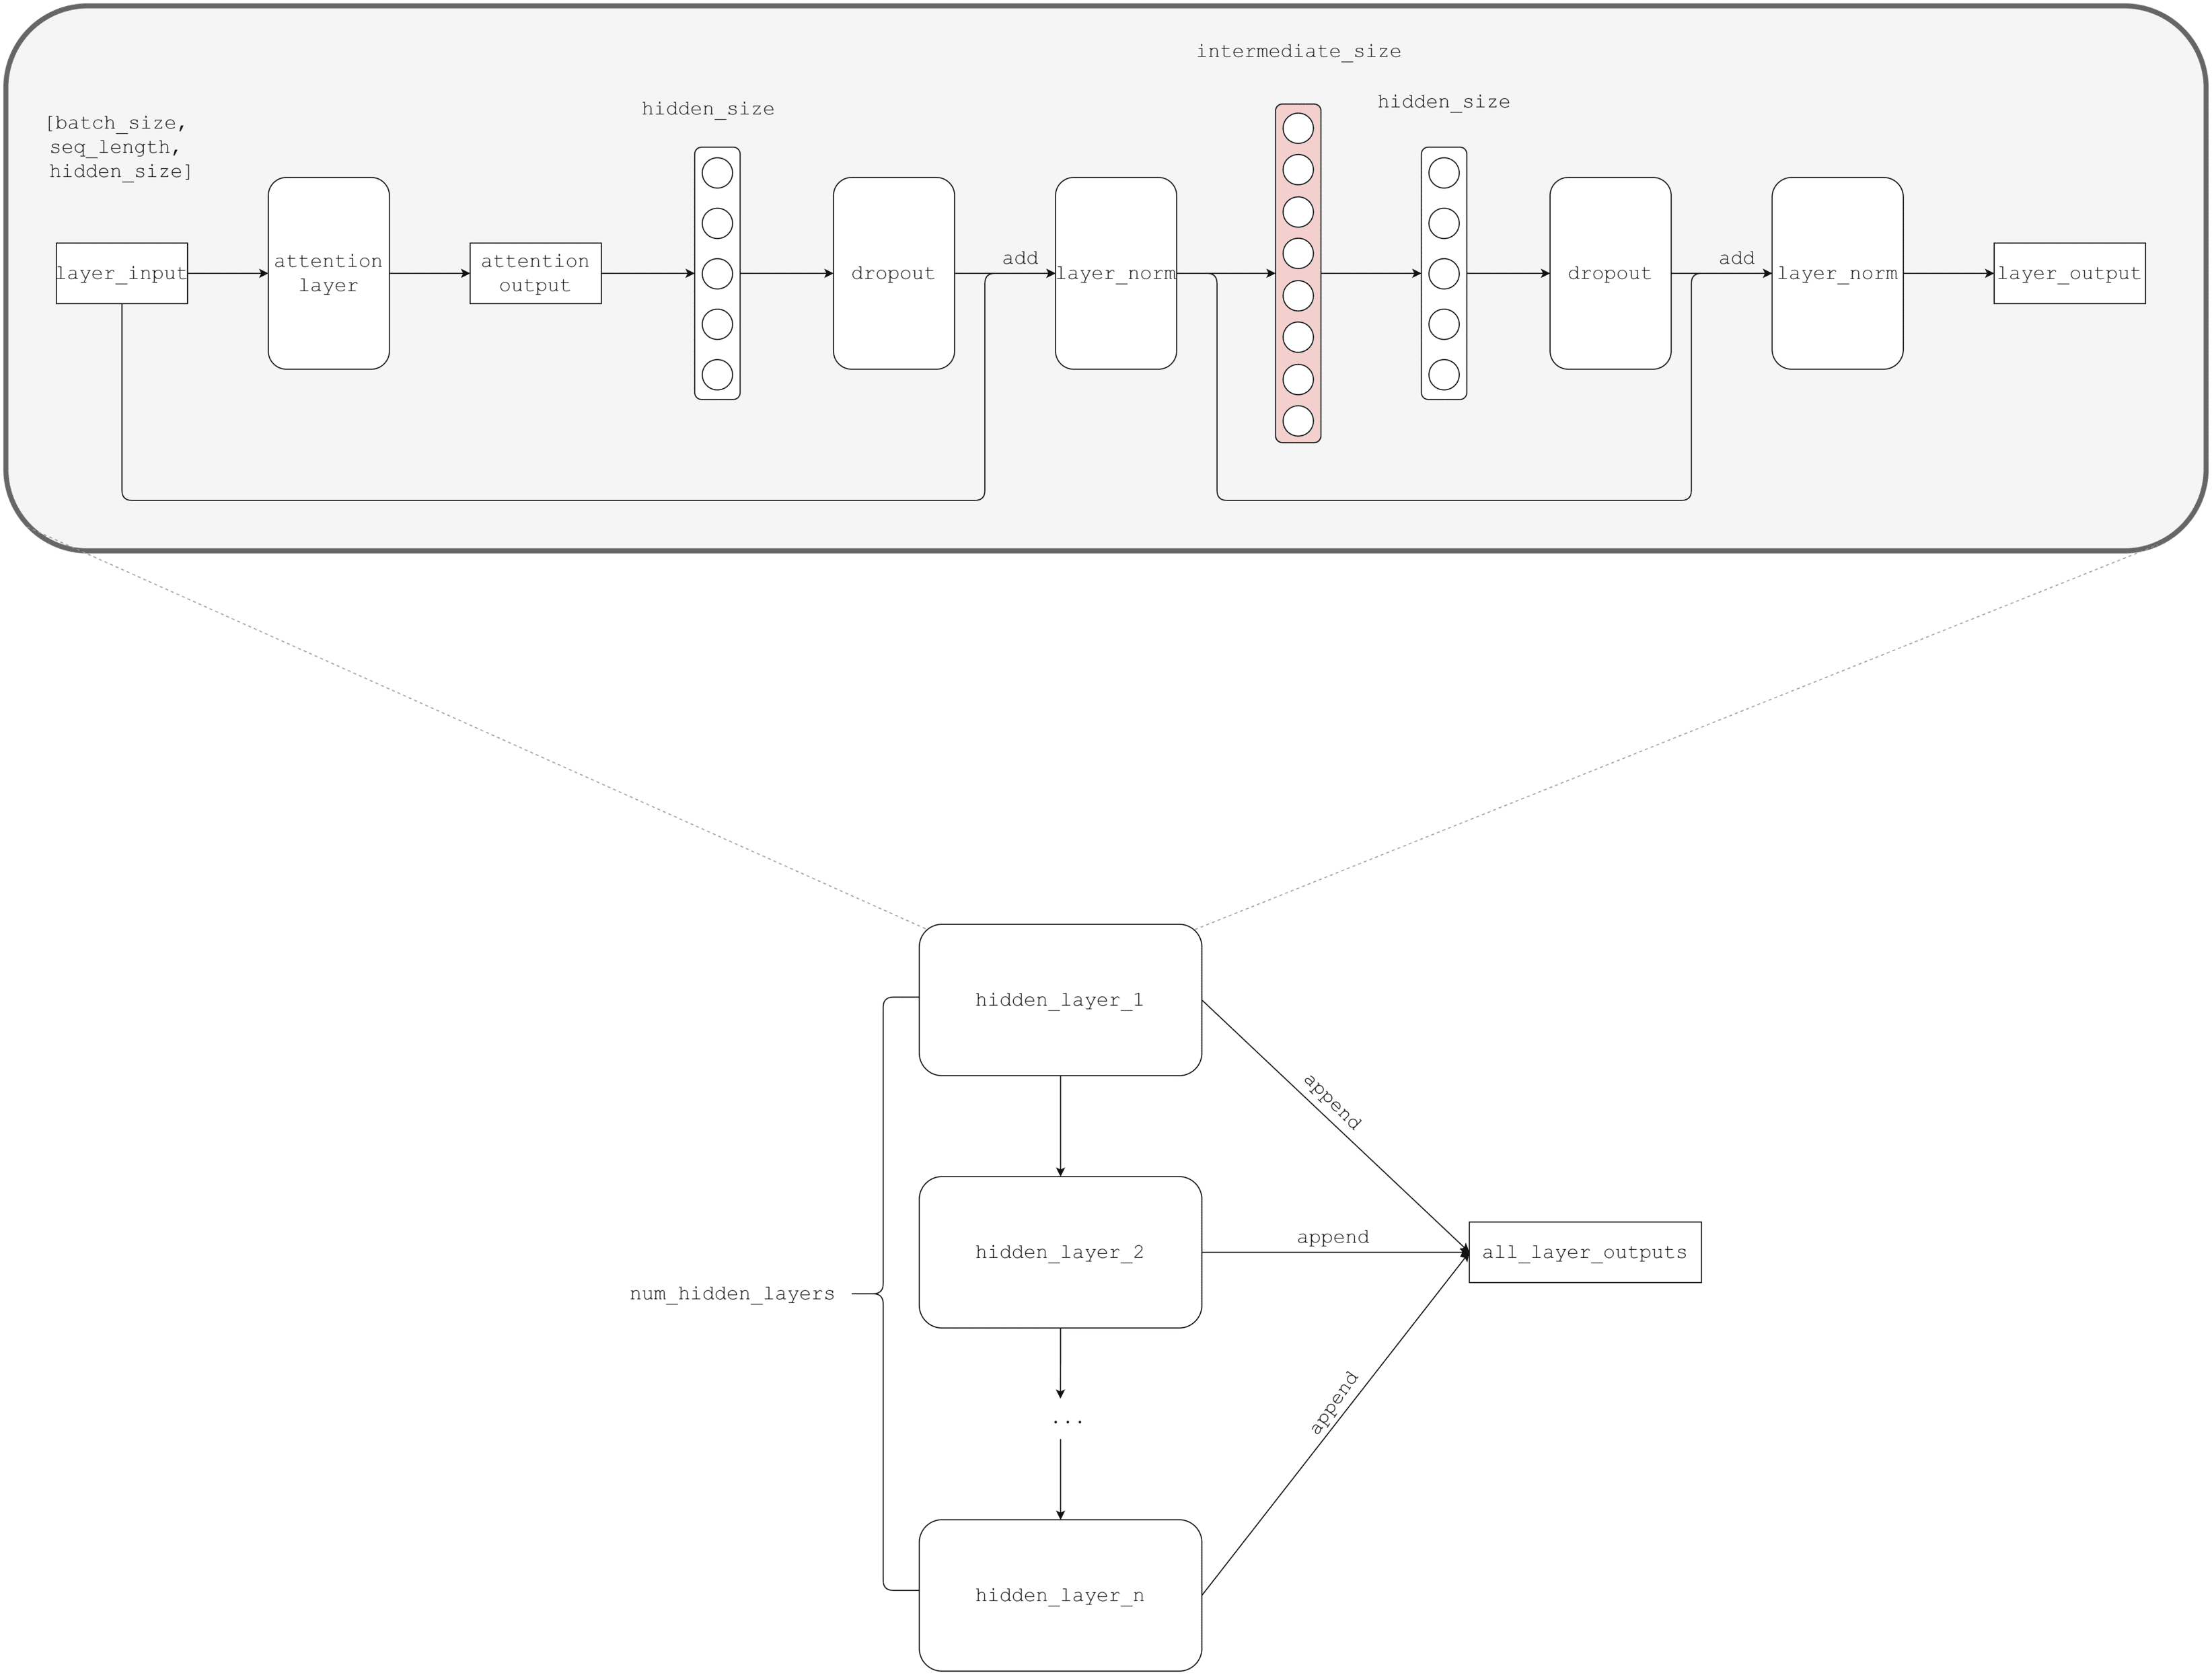
这个函数是重头戏,大致的整体流程如下图,我省略了 transpose 之类的转 shape 的操作:
OK,是不是看起来也没那么复杂?核心就是 hidden layer,我下面简单解释下一个 hidden layer 的流程:
transformer 的输入(
input_tensor是初始值,后续的输入是layer_input,即上一层的输出)的 shape 是[batch_size, seq_length, hidden_size],而hidden_size和embedding_size(或者叫input_width)是相等的,即你可以认为输入就是 embedding 结果。
- 输入送入 attention layer,得到输出 attention output。
- 一层线性映射,神经元数量(
hidden_size)和embedding_size相同。 - dropout 和 layer normalization,注意后者的输入是前者 +
layer_input。 - 一层非线性映射,默认情况下神经元数量要远大于线性映射层的数量。
- 再来一层线性映射,重新将维度拉回
embedding_size。 - dropout 和 layer normalization,注意后者的输入是前者 + 4 的输出。
- 完事,得到这一个 hidden layer 的输出,然后作为下一层 hidden layer 的输入。
这样一来,一个 hidden layer 得到一个输出,总共会得到 num_hidden_layers 个 输出,都 append 到一个 list。如果 do_return_all_layers=True 的话,就把这些输出全都 reshape 成原来的样子然后返回。否则,直接把最后一层的输出 reshape 成原来的样子然后返回。
经过一顿操作,归来还是少年。
第一步的 attention layer 在这里有非常重要的作用,后面几步基本就是对其输出做一些映射变换,比较好理解。这里的 attention 其实是 MultiHead self-attention,我们先回顾下其数学形式:
其中,
而,
现在来说下 attention layer 的实现。
attention layer 对应函数为 attention_layer(),参数为:
from_tensorto_tensorattention_mask=Nonenum_attention_heads=1size_per_head=512query_act=Nonekey_act=Nonevalue_act=Noneattention_probs_dropout_prob=0.0initializer_range=0.02do_return_2d_tensor=Falsebatch_size=Nonefrom_seq_length=Noneto_seq_length=None
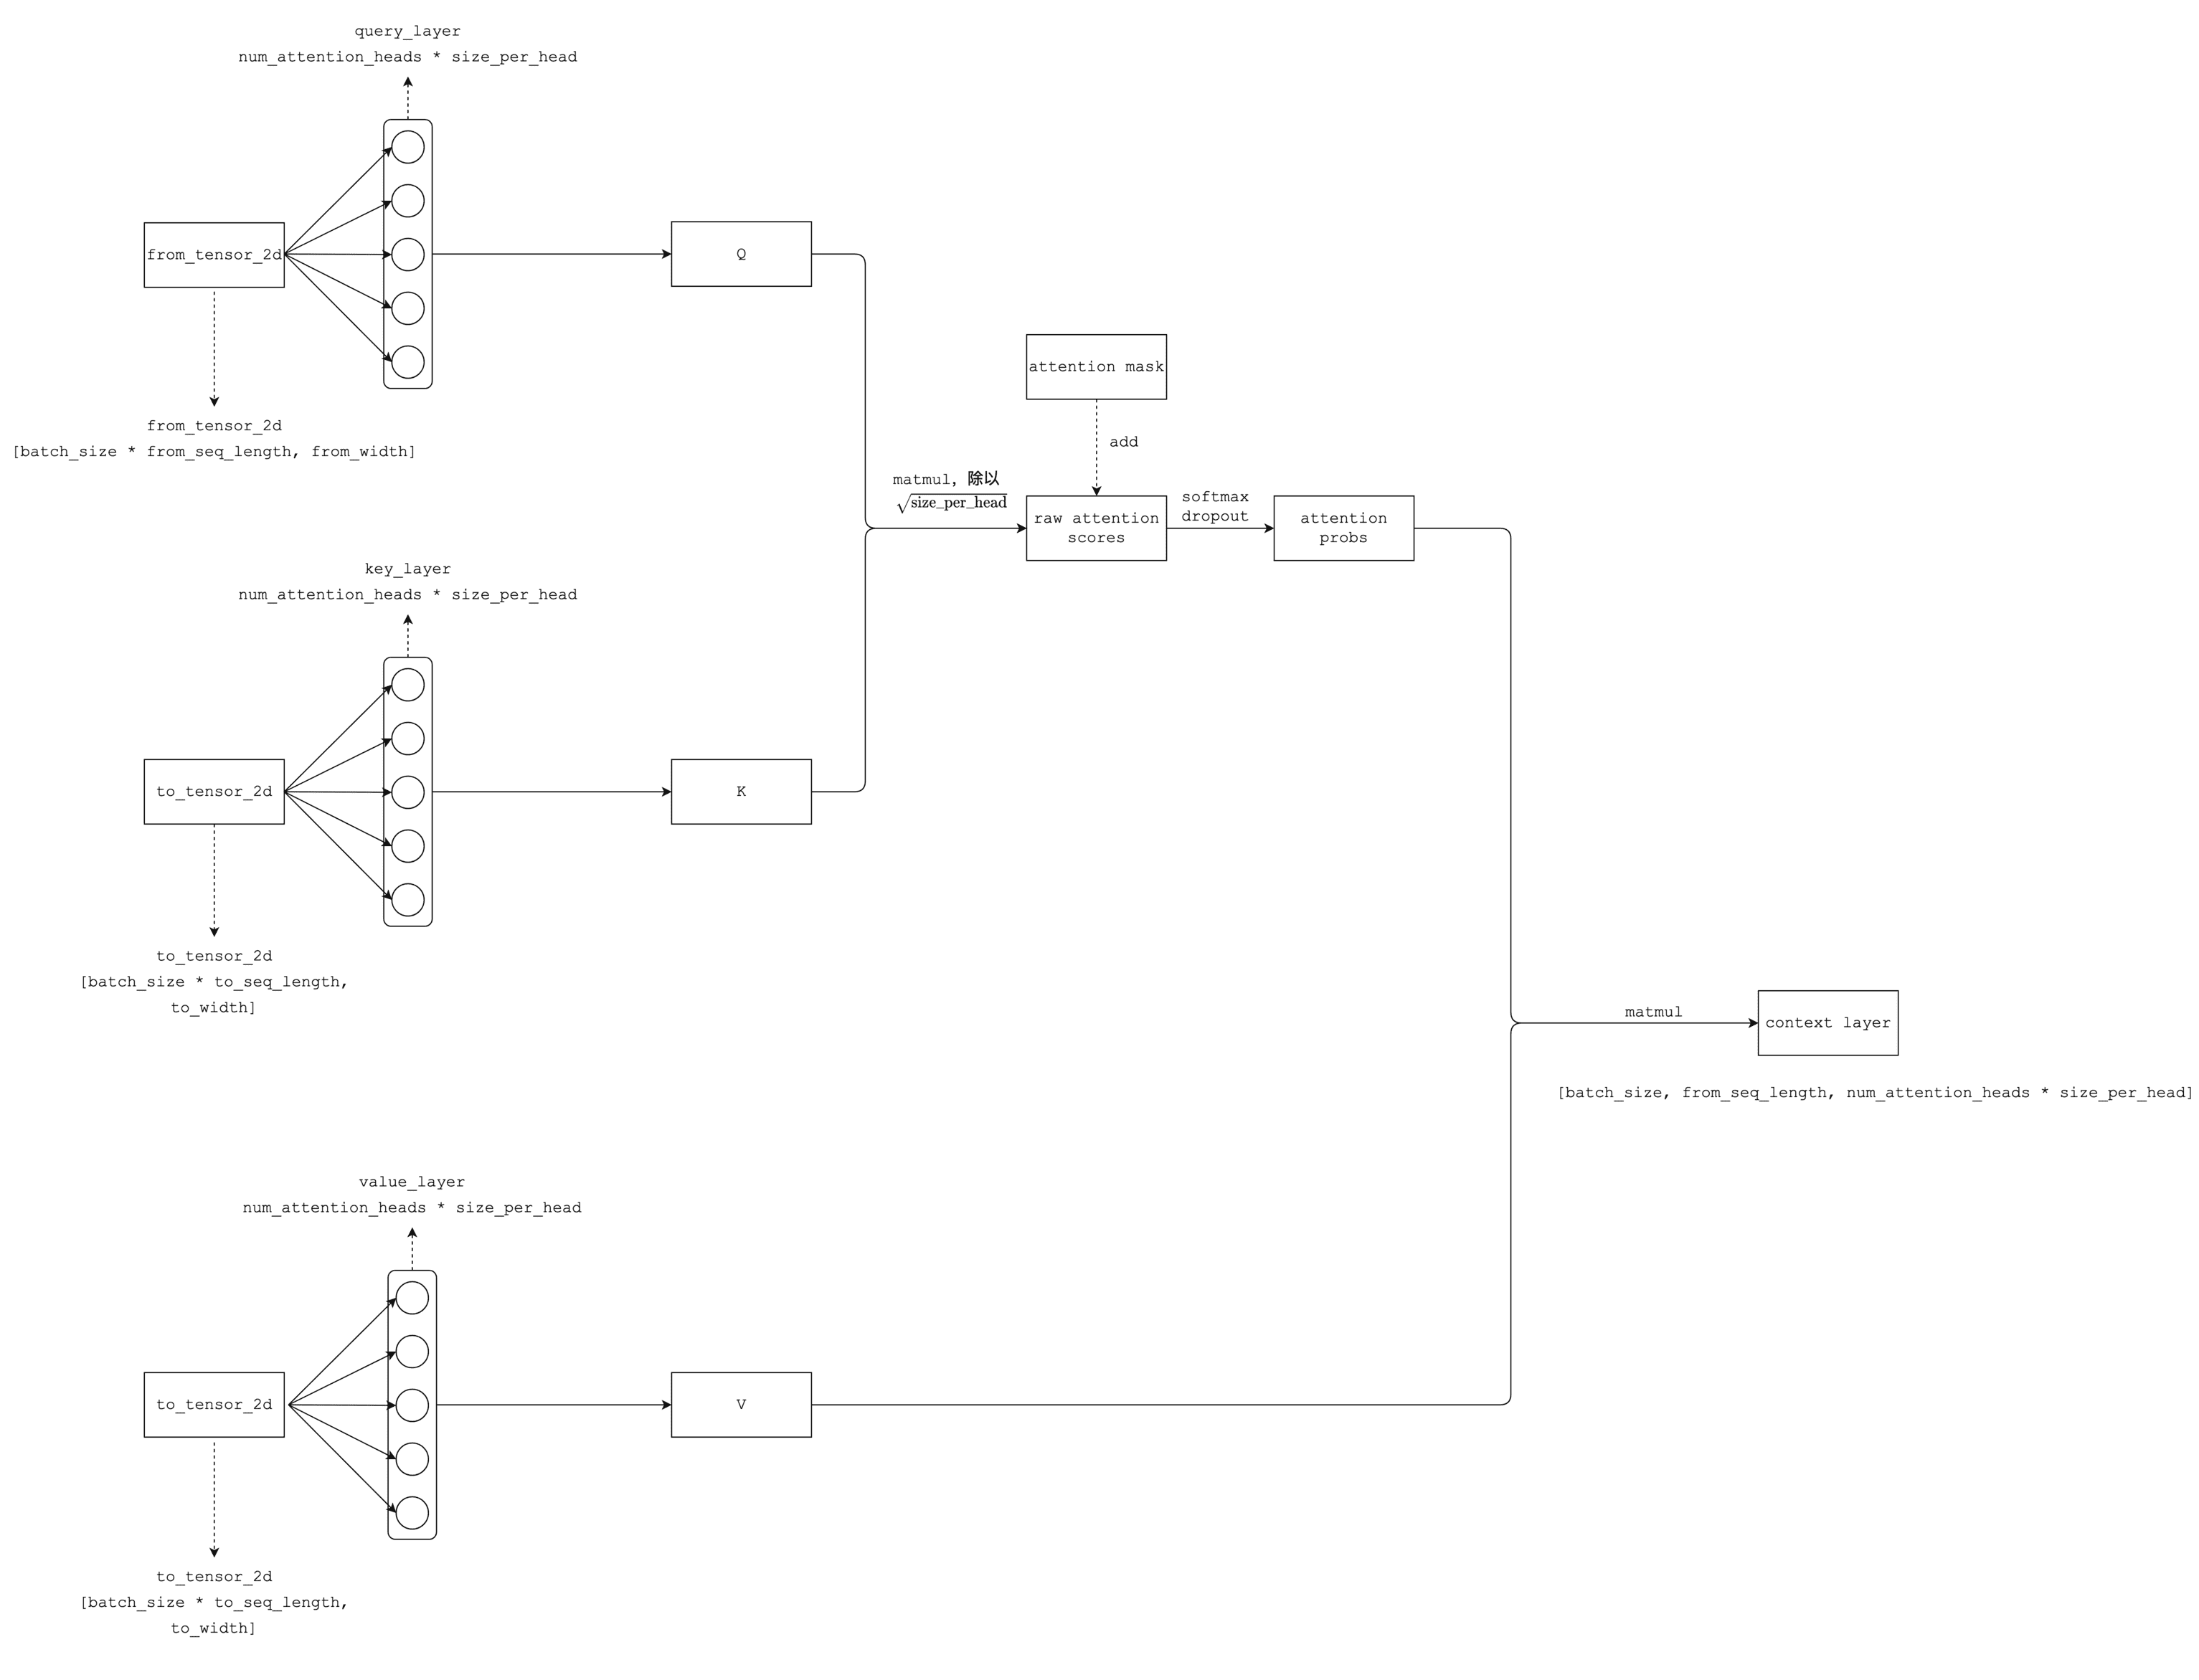
大致的整体流程如下图,我同样省略了 transpose 之类的转 shape 的操作:
看了这个图之后,相信大家会觉得过程并没那么复杂,我来简单解释下:
- 首先得到 Q、K、V 三个矩阵,都是分别经过一层相同大小的线性映射。其中 Q 通过
from_tensor得到,K、V 通过to_tensor得到。 - Q、K 经过矩阵乘法和 scale 得到初步的 raw attention score,注意 shape 为
[batch_size, num_attention_heads, from_seq_length, to_seq_length]。如果有 attention mask,那么将其加到 raw attention score 上。 - 上面得到的 raw attention score 经过 softmax,得到概率形式的 attention probability。
- dropout。
- attention probability 和 V 做矩阵乘法,得到 context layer。这就是最终的返回结果。注意 shape 为
[batch_size, from_seq_length, num_attention_heads * size_per_head],通常来说最后一维就是 embedding size。
OK,Encoder 部分到此结束。
Pooler
前面 Encoder 部分得到的多层输出,最终是取最后一层输出来输入给 Pooler 部分。这部分相对简单,只是取每个 sequence 的第一个 token,即原本的输入大小为 [batch_size, seq_length, hidden_size],变换后大小为 [batch_size, hidden_size],去掉了 seq_length 维度,相当于是每个 sequence 都只用第一个 token 来表示。然后接上一层 hidden_size 大小的线性映射即可,激励函数为 tf.tanh。
至此就得到了 BertModel 的输出了。
此外,再插播一个关于第一步实现方面的疑问。原代码中第一步的实现是这样的:
1 | first_token_tensor = tf.squeeze(self.sequence_output[:, 0:1, :], axis=1) |
此处用切片操作(0:1)来取第一个元素,保持了结果的 rank 和 sequence_output 的 rank 相同,sequence_output 的大小为 [batch_size, seq_length, hidden_size],切片操作后的大小变为 [batch_size, 1, hidden_size]。然后再用 tf.squeeze 来将第二个维度压缩掉,即大小变为 [batch_size, hidden_size]。
其实我觉得,这步操作可以简化,不使用切片操作即可一步到位,即:
1 | first_token_tensor = self.sequence_output[:, 0, :] |
不是很明白原代码那样写是有何意图,此问题尚未想清楚,欢迎评论区讨论。
总结
简而言之,BERT 的大致流程就是:引入配置 BertConfig -> 定义初始化输入大小等常量 -> 对输入进行初步 embedding -> 加入 token type embedding 和 position embedding -> 创建 encoder 获取输出 -> 获取 pooled 输出,就是最终输出了,在 run_classifier.py 中会将此输出接上一个 Dropout,然后接上一个 softmax 分类层。
run_classifier.py 中涉及 modeling.py 的地方有三处:modeling.BertModel、modeling.get_assignment_map_from_checkpoint、modeling.BertConfig.from_json_file。
BERT 构建模型部分到此结束。
Reference
- google-research/bert: TensorFlow code and pre-trained models for BERT
- [1810.04805] BERT: Pre-training of Deep Bidirectional Transformers for Language Understanding
- [1706.03762] Attention Is All You Need
- The Illustrated Transformer – Jay Alammar – Visualizing machine learning one concept at a time.
- BERT Explained – A list of Frequently Asked Questions – Let the Machines Learn
END
附录
这里是一些正文没有提到的函数的解释。
- 函数
gelu(x):GELU(Gaussian Error Linear Unit)激活函数,是 RELU 的平滑版本,见论文 Gaussian Error Linear Units (GELUs)。 - 函数
get_activation(activation_string):就是一个映射,将类似'relu'这样的str格式的activation_string,变成 tf 中实际的函数tf.nn.relu。就是一些if判断。 - 函数
get_assignment_map_from_checkpoint(tvars, init_checkpoint):获取assignment_map,同时也返回initialized_variable_names。- 什么是
assignment_map?这其实是tf.compat.v1.train.init_from_checkpoint(ckpt_dir_or_file, assignment_map)的一个参数,用于指定当前 graph 的哪些变量的值需要从其他 checkpoint 中导入,dict 格式,key 为 checkpoint 中的变量(即旧变量),value 为当前 graph 中的变量(即新变量)。 initialized_variable_names和assignment_map基本相同,后面run_classifier.py中会用其查询某变量值是否是从外部 checkpoint 中导入的。
- 什么是
dropout(input_tensor, dropout_prob):dropout 层。layer_norm(input_tensor, name=None):layer normalization 层,关于 layer normalization 和 batch normalization 的区别,参见 Weight Normalization and Layer Normalization Explained (Normalization in Deep Learning Part 2) | Machine Learning Explained 和 What are the practical differences between batch normalization, and layer normalization in deep neural networks? - Quora,简而言之就是 layer normalization 是在 feature 维度进行 normalization,而 batch normalization 是在 batch 维度进行。layer_norm_and_dropout(input_tensor, dropout_prob, name=None):先 layer normalization 后 dropout。create_initializer(initializer_range=0.02):创建一个 truncated_normal_initializer 来初始化参数。get_shape_list(tensor, expected_rank=None, name=None):获取 tensor
的 shape,list 形式返回。要注意的一点是,如果这个 tensor 有动态维度,即某个维度为None,那么返回的时候,该维度会是一个 tensor。例如有一个 shape 为[None, 3]的 tensor,调用该函数时的返回就类似于[<tf.Tensor 'strided_slice:0' shape=() dtype=int32>, 3]。函数内部实现是先获取动态维度的索引,然后使用tf.shape()来取得对应索引的 tensor 形式的维度。reshape_to_matrix(input_tensor):将一个 rank >= 2 的 tensor reshape 成 rank = 2 的 tensor,即矩阵。具体是固定最后一个维度,将剩余维度都压缩到一个维度,即reshape((-1, shape[-1]))。注意 TensorFlow 中的 rank 不同于数学中的 rank 概念,数学中是秩),而 TF 中是 ndims,即len(shape)。reshape_from_matrix(output_tensor, orig_shape_list):和reshape_to_matrix()相反,将已经 reshape 成矩阵的 tensor 重新 reshape 到原来的样子。assert_rank(tensor, expected_rank, name=None):检查 tensor 的 rank 是否符合要求(=/in expected_rank),不符合则抛出ValueError异常。注意此函数是用 dict 来存储expected_rank的。


